
Intro
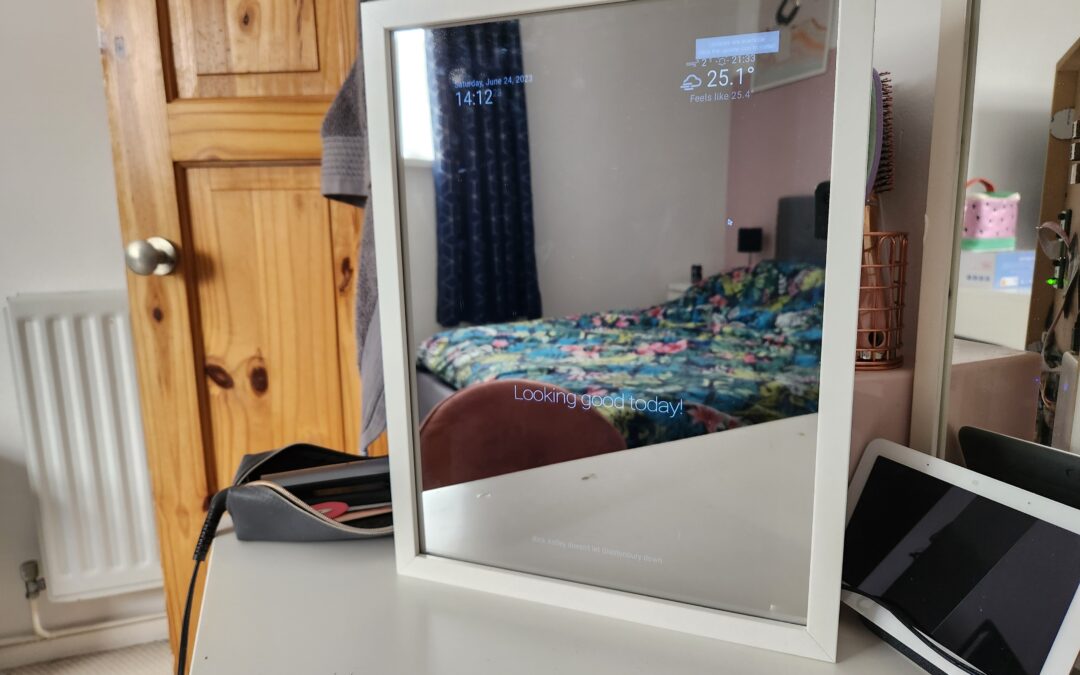
A smart mirror is usually a two-way mirror, be it a mirrored piece of acrylic, or custom two-way glass backed with a screen of some kind. The screen’s content is visible through the reflection medium due to the two-way mirrored effect. The screen can show a range of information such as the weather, local news, YouTube videos and more.
I have wanted to build my own smart mirror for a number of years, but there hasn’t always been an easy or cheap way of doing this. It has only been since the Raspberry Pi has become a more common piece of every tech enthusiast’s arsenal that we have had all of these different options for adding a mini-computer to builds in a number of ways. Due to the tiny size of the Pi, you can now add these devices to the back of a mirror which you can use to display data to the screen, add lights and so much more.
Smart mirrors have been around for well over a decade. They started taking off around the end of 2013 according to this Google Trends Data.

The Physical Build
Now in 2023, there are more ways than ever to build your own smart mirror. You could go cheap with a piece of mirrored acrylic and tape an iPad to the back of it, display a site showing your desired interface and call it a day. You could also get a custom-cut piece of toughened mirrored glass, a 4K TV display, and a Raspberry Pi 4 and go from there.
My recommended build would consist of a Raspberry Pi using one of the Smart Mirror operating system options. I will talk more about the software options later on. I have seen people use the Raspberry Pi Zero for their build, but unless you’re going really light on your operating system, I would recommend something with a bit more power. My minimum recommendation would be a Raspberry Pi 2, but get the 3 if possible. Despite the chip shortage, a model 3 can be bought for about £30 on the second-hand market.
In my build, I decided to go through a somewhat mid-priced build for a smaller mirror. My list of equipment consists of the following –
- A screen from a 2009 Macbook Pro
MODEL – (LP171WU6 1920*1200 17.1″)
Price – Free from an old laptop.
. - Laptop Video Controller with HDMI Port.
Model – HDMI VGA DVI Audio LCD LED Controller kit diy For LP171WU6 1920*1200 17.1″
Price – $26.11
. - Ikea Picture Frame
Model – Ribba White Frame
Price – £8
. - Raspberry Pi
Model – Raspberry Pi 3B+
Price – I already had one, but they go for ~£30.
. - SD Card – 8GB+
Model – SanDisk Ultra 32 GB microSDHC
Price – £5.99
. - Custom Piece of Cut Mirrored Acrylic
Model – PlasticStockists 3mm 30cm x 40cm
Price – £ 30.17 with shipping
. - Video Controller Power Supply
Model – Sagemcom 12v 1.5a AC/DC Adaptor
Price – From an old router or Amazon
. - 10,000MaH Battery Power Bank
Model – Anker Power Bank, 313
Price – £19.99, but you probably have something similar.
. - Various Cables
Models – Short HDMI 30cm, Micro USB
Price – ~£8
Why I made the hardware choices I did
I have a few spare Raspberry Pi computers laying around, then I came across an old broken 2009 Macbook Pro that I knew had a decent screen to it. I looked at how I could connect this to a Pi and the idea came from there.
This mirror was a gift for someone for an occasion. I had around a month to get this build done from the initial idea. I knew that would be enough time for research and to allow certain items to arrive, for me to test the software and to build the smart mirror.
The Screen
The screen was chosen because it has a decent resolution, a nice size for a small mirror that could go on a dresser table and it was fairly easy to get a video controller for it, even though I had to get it shipped from China on eBay.
The Computer
Initially, I decided to use a Raspberry Pi 2 because I wasn’t using it for anything, it’s getting on in age and seemed like a good choice for this build. After doing some testing, I decided to replace it with a Model 3 1.v2. This made the animations smoother and allowed for more processing headroom for the different modules that I used in the mirror’s software.
The Mirror
The biggest decision I had to make was the mirror itself. I really wanted to go with glass for the build after seeing some examples of acrylic vs glass online for smart mirrors. I ended up going with acrylic for a couple of reasons. The price was a large factor. It cost me £30 shipped to get a custom 30cm x 40cm piece of mirrored acrylic, whereas for the same sized two-way mirrored glass it was going to cost in the range of £70 from Mirrors And Glass. This was the best company that I found in the UK that could provide what I wanted. I called a couple of local manufacturers closer to where I live so that I could avoid the £15 shipping fee, but nobody near me could match the price or even provide what I was looking for in such a small quantity.
After receiving the acrylic piece less than 2 days after ordering, compared to the 15-day estimated shipping for the glass, I knew I made the right choice. I saw warnings about using acrylic due to the funhouse mirror effect where the mirror would warp due to the mounting and the size of the sheet which would cause a distorted look to the reflection. At the size and thickness I purchased, those factors have caused me zero issues. There is no warping since it sits flat in the frame.
The reflection is great and hard to differentiate from glass, the passthrough quality for the screen is also perfect. I knew using the Macbook screen would provide a bright screen for whichever mirror I chose, but it turned out a lot better than expected.
The Power
I really wanted to get this done with 1 power cable. The Pi and the video controller both need power. I am not an electrical engineer, but I considered creating my own cable with a buck converter to drop the voltage from the video controller cable and power the Pi. I ultimately went back on this due to lack of knowledge, being advised not to risk blowing up the Pi, video controller or myself.
I found this power supply on Amazon which I thought would be great to power both devices, but it didn’t work. It would power the Pi from the USB port on the brick with no voltage drop warnings, but the video controller would only flash on for half a second.
Still insistent on not using two cables, I decided to use an Anker power bank. It will power the Pi for hours and hours at a time, is easy to charge and allowed me to just have 1 cable for the video controller. I have a micro USB cable with a switch so the Pi can be switched on and off easily.
The Frame
The frame was a fairly easy choice. I have an IKEA store in my city and all I had to do was find a picture frame capable of housing the Macbook screen with a small amount of spacing around it. It cost me £8 for the Ribba frame. Unless you are custom building a frame, then your mirror’s size will depend entirely on the inside fit of your frame.

Which Software To Use
After some research, you will quickly find that there are only a handful of main choices in the operating system for your smart mirror using a Raspberry Pi.
For me, it came down to either mirr.OS or MagicMirror². They both could do exactly what I wanted to, but it came down to price. MagicMirror² is free and open source compared to Mirr.OS license plan at €7.80 a month. I didn’t want this to be a monthly cost for myself.
I did a lot of reading on MagicMirror²’s documentation, Subreddit and various forum posts. They have a large community to help you out with whatever you need and any modules you could possibly want for your mirror. I didn’t plan on doing anything extremely custom, using mostly just the default modules that MagicMirror² comes with was enough for my needs.
Installing MagicMirror²
I used Raspberry Pi Imager to install Raspberry Pi OS on my Pi and from there I install MagicMirror². There are a couple of ways to install MagicMirror², I initially went with their recommended manual option, but that gave me some JavaScript errors upon launching the software which I couldn’t solve.
I then went back to the beginning after deleting the MagicMirror folder and used the installation script from sdetweil’s GitHub page.
Just using this line from the page installed the software and it ran the first time without any configuration –
bash -c "$(curl -sL https://raw.githubusercontent.com/sdetweil/MagicMirror_scripts/master/raspberry.sh)"
After the installation, I didn’t have much more configuring to do with the actual OS other than making it auto-start on the boot of the Pi. All of that information can be found in a few commands here.
From there all you need to do is edit the config file for the modules to suit your needs. The default configuration is set up for US users for the most part, but changing the configuration is easy enough using the module documentation. I changed my date and time to Great Britain, updated the news source to a BBC UK news feed and added the UK holiday calendar from CalendarLabs.
In the future, I will look at some of the communities custom modules, but since I am writing this before I have given the mirror, I am unsure of what other features the user will want for their mirror.
What I Would Have Done Differently
I am really pleased with how this build turned out, but there are definitely some things I could see that I could improve upon if I were to do this again.
- The mirror. I did say I am happy with the acrylic, but can’t help but know how much a glass mirror would improve upon the build quality. You can get mirrors that would allow you to use a touchscreen monitor which would be nice. The durability of the glass would be much better than acrylic. I don’t see any situation where you would do any real damage to the mirror, but even wiping it over time could cause micro-scratching in the acrylic which will become more apparent over time. This could be swapped out fairly easily in the future though.
- The power. I know it’s inconvenient to keep charging the power bank throughout the use of this mirror, but I would still take this option over two cables. I would probably look into buck converter and custom cabling if I could do it again. Failing that, I would 3D print some sort of easily swap-out mount for the power bank.
- The screen. I am actually really happy with the Macbook Pro’s screen and the video controller, but there is a noticeable light bleed on the corner of the screen. I should have used some thick black tape or even some foam around these edges to prevent the light from leaking out.


4. The back aesthetics. For the most part, you will never see the back so it doesn’t matter how it looks. I tried to make it as neat as I could, but it could be hidden/improved. This mirror won’t be mounted to a wall, but it will more than likely sit on a dresser table. I may find or 3D print some legs for the back so it can sit at an angle, but the distribution of the electronics allows the mirror to comfortably sit on its own flat edge.
Outro
I am pleased with the way my mirror turned out. I learned a lot and wrote this guide to help anyone else looking to make their own. There isn’t a lot of documentation out there for full mirror builds so I thought I would add my own.
Anyone can do this, and there are even easier ways to do it compared to what I did.
Recent Comments